Did you know smurfs play chess? If not, you do now ...
I've always liked smurfs, and they've been around for my entire life, so when I saw a smurfs chess set for a very reasonable price ...
The board is basic cardboard, nothing special. But the pieces, made of plastoy, are very nicely done. Papa Smurf and Smurfette lead the white/red pieces, whereas the black/yellow pieces are led by their black-haired and black-capped counterparts.
I especially like the knights being represented by smurfs riding snails!
I do have a vague idea of creating a large board for them which is basically a smurf village: few smurf houses around the sides, a central fenced-off area featuring 64 squares, and lots of smurfs watching the imminent chess match. Maybe Gargamel lurking behind one of the smurf houses? One day ...
Sunday, December 29, 2019
Friday, December 20, 2019
Rebel Fury set
Rebel Fury is one hell of a chess variant. The initial set-up looks like this:
Pieces include Dragons, Capricorns, Gorgons, Harpies, Mimotaurs and Ximaeras. And Furys, which are the 'royal' pieces: they need to be captured to win the game, and each side has two of them ... Most pieces move the same (like the queen in FIDE chess), but have very different powers; full details are here if you're interested
As it's such a crazy chess variant, I was very keen to create a set myself. Surfing around for ideas, I stumbled across a full set of Loka pieces, and these gave me the number and variety I needed for Rebel Fury.
The pieces came in four colours, green, blue, yellow and red, and I decided to use blue and green pieces for one side, yellow and red pieces for the other. Given this amount of colour, I wanted to make a board which was just as colourful, and got myself several sheets of glass mosaic tiles.
A few rainy days were enough to glue the glass mosaic tiles on a piece of plywood, with half the board having red and yellow squares, and the other half green and blue squares. Advancers (pawns) promote once they reach the enemy half of the board, so it makes sense to distinguish between the two halves.


Underside of the board received 'feet' and was painted black.

Those feet raised the board just enough to have mosaic tiles along the edge as well.
So here is the completed board, in all its colourful glory! It's quite heavy as well, by the way; all that glass adds up.
In order to be able to distinguish the pieces more easily, I wrote the first letter of their identity on the underside of their bases.

And all that remains to be done now is to set up the board with all the pieces in their starting position.
Pieces include Dragons, Capricorns, Gorgons, Harpies, Mimotaurs and Ximaeras. And Furys, which are the 'royal' pieces: they need to be captured to win the game, and each side has two of them ... Most pieces move the same (like the queen in FIDE chess), but have very different powers; full details are here if you're interested
As it's such a crazy chess variant, I was very keen to create a set myself. Surfing around for ideas, I stumbled across a full set of Loka pieces, and these gave me the number and variety I needed for Rebel Fury.
The pieces came in four colours, green, blue, yellow and red, and I decided to use blue and green pieces for one side, yellow and red pieces for the other. Given this amount of colour, I wanted to make a board which was just as colourful, and got myself several sheets of glass mosaic tiles.
A few rainy days were enough to glue the glass mosaic tiles on a piece of plywood, with half the board having red and yellow squares, and the other half green and blue squares. Advancers (pawns) promote once they reach the enemy half of the board, so it makes sense to distinguish between the two halves.


Those feet raised the board just enough to have mosaic tiles along the edge as well.
So here is the completed board, in all its colourful glory! It's quite heavy as well, by the way; all that glass adds up.
In order to be able to distinguish the pieces more easily, I wrote the first letter of their identity on the underside of their bases.

And all that remains to be done now is to set up the board with all the pieces in their starting position.
Tuesday, December 17, 2019
Metal & Malachite set
A number of years ago, when I got myself a board for Star Trek Tridimensional chess, I found a small set of classical style metal pieces to use on this board (and I quite liked the result of combining a futuristic board with classical pieces). The set also came with a circular board made of malachite, which I then put aside, and lost track of.
It so happens that I stumbled across it again, in the back of a cupboard!
So time to put the pieces on their home board again?
After the wooden travel set I got from one of my PhD students, this malachite board with metal pieces is the smallest in my collection. And the board, in all its malachite glory, is one of the most beautiful boards I have.
As you read this, the pieces are back on the tridimensional board, but there's of course nothing stopping me from using them on either board, as and when required.
Friday, December 6, 2019
Royal Beasts set
The Royal Beasts, aka Queen's Beasts, are a series of heraldic statues created for the queen's coronation in 1953. I got a set of Royal Beasts chess pieces as a birthday present, from the same Etsy shop as I got my Lewis chess pieces from.

This is the king; they are quite big pieces!
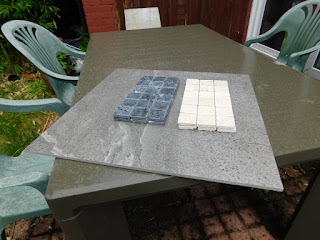
My idea for a board for this Royal Beasts chess set was a permanent board in the garden, so I got myself a large stone tile plus light and dark mosaic stone tiles.
A large flower pot was weighted down with sand, and placed in a nice corner of the garden, to act as a base for the board.


Stone mosaic tiles were then fixed to the large stone tile.
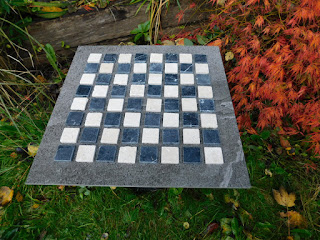
Board is ready to receive the pieces!

I think it looks really good, with the stone board nicely matching the pieces. I am not planning to keep the pieces out in the garden all the time, but occasionally they'll be allowed out to play. If I can take any interesting photos of the pieces 'in the wild', I'll create another blog post. I've already seen a cat contemplating its opening move.
Maybe a pigeon will want to come and play as well? Watch this space!

This is the king; they are quite big pieces!
My idea for a board for this Royal Beasts chess set was a permanent board in the garden, so I got myself a large stone tile plus light and dark mosaic stone tiles.
A large flower pot was weighted down with sand, and placed in a nice corner of the garden, to act as a base for the board.


Stone mosaic tiles were then fixed to the large stone tile.
Board is ready to receive the pieces!

I think it looks really good, with the stone board nicely matching the pieces. I am not planning to keep the pieces out in the garden all the time, but occasionally they'll be allowed out to play. If I can take any interesting photos of the pieces 'in the wild', I'll create another blog post. I've already seen a cat contemplating its opening move.
Maybe a pigeon will want to come and play as well? Watch this space!
Monday, December 2, 2019
Four Seasons chess set - autumn
Following the completion of the board for my Four Seasons chess set at the end of the summer, the next phase, autumn, would obviously involve the pieces. And what really represents autumn as a season? Yes, things that drop off trees in the autumn!
So I collected pine cones, conkers, beech nuts, sycamore 'wings', acorns and walnuts, and I'm going to use those to create the various pieces.
To see what they will look like, you'll have to wait until the set is completed over the winter!
So I collected pine cones, conkers, beech nuts, sycamore 'wings', acorns and walnuts, and I'm going to use those to create the various pieces.
To see what they will look like, you'll have to wait until the set is completed over the winter!
Friday, November 29, 2019
Alabaster set
Have you heard of a Japanese art form called 'kintsugi'? If not, it's used in pottery. When a piece of pottery is broken and repaired, rather than try and make the repairs as invisible as possible, they are actually highlighted with gold. I really like the philosophy behind it, giving a piece of pottery a new lease of life, but in a way that shows the piece has had a life already. Sort of being proud of your scars and not ashamed to show them, as they are part of who you are and the life you have had.
Why do I mention kintsugi in a blog post on an alabaster chess set? Well, it all started with a very nice alabaster set, made by C A&A in Italy, listed on eBay, including the marble board. The buy-it-now price was very low, so I jumped on it; pieces and board duly arrived, in two separate boxes


The seller was very apologetic and immediately offered a full refund. In the end, as I was keen to keep the (undamaged) pieces, we agreed on partial refund, just for the board.
But of course, I now had pieces that needed a board .... two options, essentially: find a replacement board, or somehow repair the broken one. Another marble board that matched the pieces in size and colour proved elusive, and then I remembered kintsugi ... how about repairing the board kintsugi-style? If it didn't work out, I still had the option to keep looking for a replacement board.
As I wanted to make sure the glued-together board was supported in some way, I got a square of plywood and spray-painted it gold. I glued the pieces of the board to each other and to the plywood base.

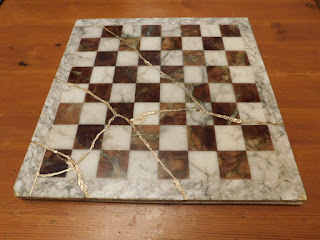
I then used gold paint (rather than actual gold, I have to admit) to highlight the breaks, as well as the places where the lacquer had come off.

Done! It looks pretty good, I think, and the gold paint highlights the cracks and other damage in a very positive way, giving the board a character it didn't have before it broke.
So ... time to put the pieces on the board.
The full set definitely has more character now than ever before; just what kintsugi is all about .... Although I wouldn't necessarily go as far as saying I should break all boards before adding them to the collection, this set surely has a unique place in it.
Why do I mention kintsugi in a blog post on an alabaster chess set? Well, it all started with a very nice alabaster set, made by C A&A in Italy, listed on eBay, including the marble board. The buy-it-now price was very low, so I jumped on it; pieces and board duly arrived, in two separate boxes


Unfortunately, the seller naively thought that simply putting some 'fragile' tape around a cardboard box would prevent it being kicked about in the postal system. The pieces were fine, as they had some protection inside their own box, but, not being protected by anything like bubble wrap or polystyrene, the marble board arrived in a number of larger and smaller pieces ....
The seller was very apologetic and immediately offered a full refund. In the end, as I was keen to keep the (undamaged) pieces, we agreed on partial refund, just for the board.
But of course, I now had pieces that needed a board .... two options, essentially: find a replacement board, or somehow repair the broken one. Another marble board that matched the pieces in size and colour proved elusive, and then I remembered kintsugi ... how about repairing the board kintsugi-style? If it didn't work out, I still had the option to keep looking for a replacement board.
As I wanted to make sure the glued-together board was supported in some way, I got a square of plywood and spray-painted it gold. I glued the pieces of the board to each other and to the plywood base.

I then used gold paint (rather than actual gold, I have to admit) to highlight the breaks, as well as the places where the lacquer had come off.

Done! It looks pretty good, I think, and the gold paint highlights the cracks and other damage in a very positive way, giving the board a character it didn't have before it broke.
So ... time to put the pieces on the board.
The full set definitely has more character now than ever before; just what kintsugi is all about .... Although I wouldn't necessarily go as far as saying I should break all boards before adding them to the collection, this set surely has a unique place in it.
Subscribe to:
Posts (Atom)


